
In this tutorial I’m going to go over how to blend meshes with terrain (or even other meshes) in unity. This tutorial is fairly advanced, but I’ve tried to break it up into individual stages. I assume a general knowledge of how to use unity as well as some basic knowledge of C#. This tutorial is designed for amplify, but I imagine it can pretty much be applied to Shader Graph as well. This is my first tutorial so hopefully it’s coherent, if you have any suggestions for improvement do let me know! I’ve included a starter kit which includes some of the supplementary shaders used in this project as well as the basic setup needed to get started. All the project files for this tutorial are currently available to my $5 and above patreons, but will be made available to everyone in the near future.
Starter Kit: LINK
Complete Project: LINK [Patreons Only]
A quick note: given the length of this tutorial I want to make sure you are aware of the advantages and disadvantages of this shader. This tutorial covers two version of the shader. The first allows for a single blend texture – this makes the shader suitable for high resolution textures, but you are limited to one predefined texture to blend. The second shader can blend between any number of low resolution or single colour terrains textures (or mesh terrain textures with some adjustment) and works on both unity terrain as well as mesh terrains. These shaders do not have fully functional normal blending, which would probably be necessary for using them in non-stylised games, but it should be possible to implement better normal blending yourself.
So, let’s get started then. First off, I’m going to outline the problem and explain the theory behind what were going to achieve. In order to blend between the terrain and other meshes we need some way of telling the shader when it is intersecting with the terrain. This is much easier said than done, but hurrah there is a way! The solution you ask? Render textures!
What is a render texture?
A render texture is essentially the viewpoint of a camera saved to an asset file. Render textures in games are commonly used for things like displaying CCTV screens. We can also use render textures to save the view from a camera in the editor, that texture can then be used in a shader. This is useful because we can bake information about our terrain, such as its height, normals and colours to a texture which we can then use at runtime to blend between meshes and the terrain.

The Setup
To get started let’s create a new scene and create a terrain. Then lets set its size to something more manageable like 200×200. Now paint the terrain however you like. Now create a new layer (https://docs.unity3d.com/Manual/Layers.html) called “Terrain” and assign the terrain to that layer. This is so the cameras mask can be set to only record the terrain to the render texture.

In the starting project files, there is a prefab called “BlendBakingCamera” – drag that into the scene. This is a simple orthographic camera. On the camera you need to set the culling mask to the newly created terrain layer. Position the camera in the centre of your terrain with a height slightly above the highest point on your terrain. Then adjust the far clip plane so the camera can see to the floor of your terrain. The final setup should look like this:

Replacement Shaders
Now are cameras set up we need some way of recording data from the terrain. To do this were going to use Replacement Shaders. Replacement shaders seem daunting, and certainly for a long while I had no clue what they did. But they are in fact remarkably simple and powerful. Using a replacement shader just means rendering every object in view of the camera with a single shader, regardless of what shader is on your objects they will all be rendered with the selected replacement shader which is just a regular shader.
The shader we need for our blend effect is a depth shader. This renders the scene depth and is the key component in creating our blend effect as it writes the depth values of our camera to a texture so we can read them back later. For more info on this shader and a generally excellent in depth look at replacement shaders check out this tutorial by Making Stuff Look Good in Unity: LINK

Let’s start baking
Were going to create a new class and call it “TerrainBlendingBaker”. Lets start by implementing the basic terrain intersection depth mask, and later we’ll come back to this script to add colors and normals.
Lets start by defining some variables.
    //Shader that renders object based on distance to camera
    public Shader depthShader;
    //The render texture which will store the depth of our terrain
    public RenderTexture depthTexture;
    //The camera this script is attached to
    private Camera cam;
Now lets create a new method called ‘UpdateBakingCamera’. In this method were going to set any data about the camera that the shader might need to render a terrain blend to global variables.
private void UpdateBakingCamera()
    {
        //if the camera hasn't been assigned then assign it
        if (cam == null)
        {
            cam = GetComponent<Camera>();
        }

        //the total width of the bounding box of our cameras view
        Shader.SetGlobalFloat("TB_SCALE", GetComponent<Camera>().orthographicSize * 2);
        //find the bottom corner of the texture in world scale by subtracting the size of the camera from its x and z position
        Shader.SetGlobalFloat("TB_OFFSET_X", cam.transform.position.x - cam.orthographicSize);
        Shader.SetGlobalFloat("TB_OFFSET_Z", cam.transform.position.z - cam.orthographicSize);
        //we'll also need the relative y position of the camera, lets get this by subtracting the far clip plane from the camera y position
        Shader.SetGlobalFloat("TB_OFFSET_Y", cam.transform.position.y - cam.farClipPlane);
        //we'll also need the far clip plane itself to know the range of y values in the depth texture
        Shader.SetGlobalFloat("TB_FARCLIP", cam.farClipPlane);

        //NOTE: some of the arithmatic here could be moved to the shader but keeping it here makes the shader cleaner so ¯\_(ツ)_/¯
    }
Now lets actually bake our terrain depth to a texture.
    // The context menu tag allows us to run methods from the inspector (https://docs.unity3d.com/ScriptReference/ContextMenu.html)
    [ContextMenu("Bake Depth Texture")]
    public void BakeTerrainDepth()
    {
        //call our update camera method
        UpdateBakingCamera();

        //Make sure the shader and texture are assigned in the inspector
        if (depthShader != null && depthTexture != null)
        {
            //Set the camera replacment shader to the depth shader that we will assign in the inspector
            cam.SetReplacementShader(depthShader, "RenderType");
            //set the target render texture of the camera to the depth texture
            cam.targetTexture = depthTexture;
            //set the render texture we just created as a global shader texture variable
            Shader.SetGlobalTexture("TB_DEPTH", depthTexture);
        }
        else
        {
            Debug.Log("You need to assign the depth shader and depth texture in the inspector");
        }
    }
These values will become much clearer once we get started on the shader, but here’s a quick image that might provide some early illumination:

So that’s everything we need to create a basic blend effect in a shader. Our script so far should look something like this: LINK
Ok so now we’ve finished the script we can assign it in the baking camera we added earlier. In the starter assets there is a shader called ‘DepthShader’ (Inresin/Shaders/DepthShader) and a render texture called ‘DepthTerrainRT’ (Inresin/RenderTextures/DepthTextureRT), assign these the appropriate slots on the inspector.
With that done just run the method through the context menu to bake our terrain depth to the render texture.

The Shader
Let’s finally make the blending shader! Create a new standard surface amplify shader and open it, call it ‘TerrainBlending’ or something.
Now, we need to create a UV for our render texture. This is the difference between the point that is being rendered and the position of our baking camera, scaled by the total area. The three global variables are the ones we just created in our script. We also register the worldY as a local variable as we are going to need it later.

Let’s grab that depth texture we assigned to a global variable (to do this add a texture sample node, set it to global and name it ‘TB_DEPTH’) if we put its output into the debug slot of the amplify shader, we can see what’s going on. Create a plane with a material with our new shader assigned applied to it.
Ok so were getting the depth information in the shader, now we need to add a y offset so its blends to the surface.

This block scales the y position of the mask by far clip plane, subtracts that from the world y position of the point being rendered and then finally offsets that by the bottom of the cameras bounding box (the y position of the camera minus the farclip plane).
Now were getting somewhere! We can see the edges of our plane blending with the terrain.

Ok, lets add some more control over how the terrains get blended.

Now we can control the thickness and falloff of the terrain blend.

I guess we might as well add some noise while were at it, lets use the world position to generate some noise from a texture.

There’s a noise textures included in the textures folder of the project starter kit which you can assign in the inspector or as a constant in the shader itself.
Its finally time to add some textures! To start with lets use some simple single colour textures, I’ve included 2 in the started assets texture folder. Assign the ‘SingleColorGrass’ texture as the texture on the terrain. Then in the shader you need to create a terrain texture and object texture node. We’ll lerp between these based on the red channel of the mask we just created.
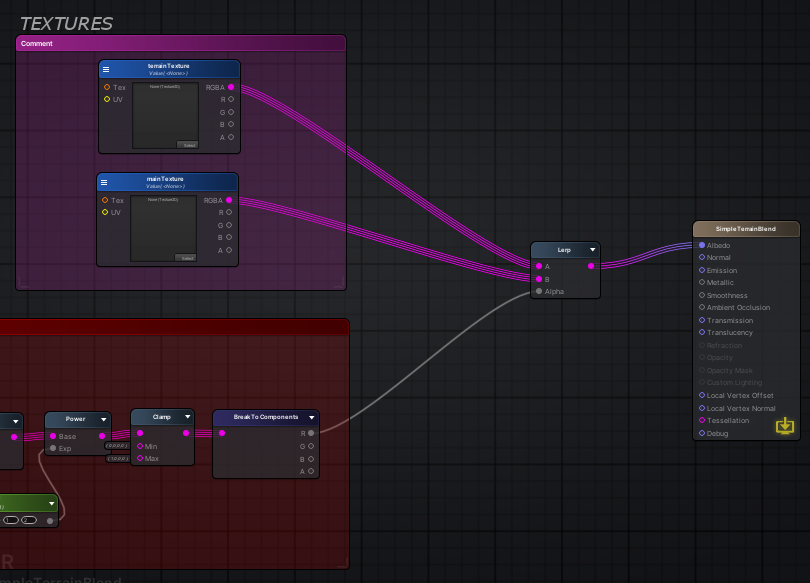

Here is the full shader:

Adding a toon custom lighting, or unlit lighting model will provide the best results for this shader. I’ve included a unlit terrain shader and a unlit version of the shader in the full package available to $5+ patreons.

I also recommend adding a tri-planar shader to the terrain, and possibly to the other meshes. I can do a future tutorial on this even there are enough people unsure how to do so.
And were pretty much done with the bulk of this tutorial. I’ve included some bonus sections which provide scope for extending the shader.
Extending the shader – Normals
I’ve included a normal shader in the files, you can use this to record the terrain surface normal and attempt to blend that as well. I don’t need blended normals for my game so I’ve only experimented a little with trying to blend normal, but it only seems to work effectively on terrain without a high degree of height variation thus far. I’ve included a normal mapping shader in the shader section of the starter kit. Here’s my additional graph my basic normal map implementation:

The code is pretty much the same as for the depth map, but this time we use a normal map as the replacement shader. I’ve also included an render texture set up to record the normal (although it may require some tweaking).
To get normal working properly perfecting it will require some extra effort and tweaking on your behalf, and may be limited to fairly low lying terrains (but I honestly haven’t done enough testing to find out).
Extending the shader – All the colours
I’m not going to go into too much detail on this because its beyond the scope of what I need for my game, but I came up with it while writing this tutorial. In order to add multiple colour blending we can sample the unlit colors of the terrain and save those to a texture as well. This is limited to a fairly low resolution, but works very well when using single color or low resolution terrain textures, or when using a faint bleed. With some small adjustments this can also be applied to mesh terrains.
Here’s the extra code for the multi color variant:
    [Header("The following settings are only if using the multi-color terrain shader")]
    //Shader that renders the unlit terraom of an object
    public Shader unlitTerrainShader;
    //The render texture which will store the normals of our terrain
    public RenderTexture surfaceTexture;
    //An unlit terrain material used to capture the texture of our terrain without any lighting
    public Material unlitTerrainMaterial;
    //The terrain you want to capture the textures of
    public Terrain yourTerrain;

    [ContextMenu("Bake Surface Texture")]
    public void BakeTerrainSurface()
    {
        UpdateBakingCamera();

        //return if there is no terrain assigned
        if (yourTerrain == null)
        {
            Debug.Log("You need to assign a terrain to capture surface texture");
            return;
        }

        StartCoroutine(BakeColors());
    }

    IEnumerator BakeColors()
    {
        Material tempTerrainMaterial = yourTerrain.materialTemplate;

        yourTerrain.materialTemplate = unlitTerrainMaterial;

        yield return 0;

        cam.SetReplacementShader(unlitTerrainShader, "RenderType");
        cam.targetTexture = surfaceTexture;
        Shader.SetGlobalTexture("TB_SURFACE", surfaceTexture);

        yield return 0;

        cam.targetTexture = null;
        yourTerrain.materialTemplate = tempTerrainMaterial;

        yield return null;

    }
The only change to the shader is we rather than use a predefined texture we use our globally set terrain surface texture, which we will use the relative position as the UV. This could also be extended to allow for nicer texture blending.

Here’s the full multi-colour with normal blending shader graph:

FINAL REMARKS
If you made it this far, congrats! As I mentioned in the intro this is my first tutorial, any feedback would be greatly appreciated. If would like to support me in making games and tutorials please check out my patreon or give me a follow on twitter:
Patreon: https://www.patreon.com/Inresin
Twitter: https://twitter.com/inresin

Hi, can you explain how to do that with shader graph in URP/ HDRP?
LikeLike
I don’t use shader graph, but theoretically it should be very similar. Each tool is very similar so I’ve usually been able to recreate shader graph shaders in Amplify by googling the name of each node and finding the equivalent. Good luck, let me know if you run into any specific issues.
LikeLike
Ill just note here that URP does not support replacement shaders:
https://docs.unity3d.com/Packages/com.unity.render-pipelines.universal@7.1/manual/universalrp-builtin-feature-comparison.html
Awesome tutorial by the way!
LikeLike
Thank you ! I didn’t know that, but it might still be possible to achieve the effect in URP by manually setting your terrain shader to the depth shader, baking the texture, then setting it back.
Let me know if you have any luck with this !
LikeLike
Can’t you obtain the depth sampling the terrain’s heightmap texture with appropiate coordinates?
LikeLike
this would likely work! the advantage of the method in this tutorial is that it works for mesh terrains as well, or terrains that use a combination of meshes and unity terrains
LikeLike
Hi, your tutorial looks great but I’m stuck at the debug part, I can’t get this black and red debug texture despit having copied your script and nodes !
Can I ask you which versions of Unity and Amplify were you using for this tutorial ? I’ve tried with the two latest versions of Unity (2019.3.7 and 8) but I wonder if there isn’t an issue with Amplify since your tutorial and its latest update on the asset store were published the same day !
LikeLike
it’s quite unlikely anything the version (of either amplify or unity) is the issue. what do you see instead? is it entirely red? check the render texture to make sure that it’s being generated
LikeLike
My square is entirely red indeed, and so is the render texture every time I bake it. From what I can see on your gif I take it that the red color indicates the highest points, but I’m not really sure what to make of it :0
LikeLike
My square is entirely red indeed, and so is the render texture every time I bake it. From what I can see on your gif I take it that the red color indicates the highest points, but I’m not really sure what to make of it :0
LikeLike
Yeah that means the render texture is not being baked for some reason, check that your camera is set up correctly
LikeLike
Gosh, I can’t believe it – I had just put the blending shader instead of the depth one you provided into the terrain blending script ! I’ve wasted too much time on that ridiculous mistake o_0
Anyway, there’s nothing wrong with Unity nor Amplify, and I’m halfway through now, I’ll complete it tomorrow and maybe I’ll share a screenshot :3 Just one thing about your tutorial though : you should post some higher quality pictures, at least for the noise section in which the first node is unreadable – though if I got it right it’s “Swizzle” with the X and Z channels ?
LikeLike
you’re correct about the twizzle node! yeah, I definitely need to use some higher resolution screenshots in future. Please do send me a picture of your finished result!
LikeLike
Hey. Thanks for the tutorial! I try to recreate it in shader graph in URP project. I have problems with setting my terrain’s material to your Depth shader (I try to do it manually, as someone pointed out that URP doesn’t support replacement shaders), it doesn’t seem to work. Do you know if this shader is compatible with URP?
LikeLike
Ah you are you correct that’s its probably not compatible, but it doesn’t rely on lighting so should be fixable with a single line – see here:
https://answers.unity.com/questions/1710171/how-to-adapt-this-shader-to-urp.html
LikeLiked by 1 person
I have converted this to use 2 different custom forward renderers on URP and making the script update the render textures only once. I also got it working for multiple terrains by making the render camera follow the player on a smaller scale and send this position as a global shader vector for UV calculations, it updates the render textures only if the player goes too far from the previous update position for lower overhead.
LikeLike
Hi does your Patreon full project files have the ASE versions I can see in these screenshots. If it does you should consider put this info on your patreon as its will be the reason a lot of us want to sub to you.
LikeLike
Hi! Yeah all the ASE shaders in screenshots are included as well as a simple toon terrain shader
LikeLike
Hey, thanks for the detailed tutorial. One thing I am having problem is the depth camera doesn’t see the new terrain group (it works with a regular terrain). Do you have any suggestions about that?
LikeLike
hey! is the layer of the terrains in the terrain group set to terrain (or the same layer as your baking camera)?
LikeLiked by 1 person